I AM A

We Make You Smile

diy

Easter Baking : Raspberry Chocolate Chip Plant-Based Cookies

yum, diyI AM AComment

Every bank holiday, or long weekend we like to do a spot of baking. Especially getting up early as we like to both celebrate that it’s holiday (wahey!), and finally we have time to try out some of the recipes that have been earmarked for a while. This moorish recipe we came across is from Deliciously Ella, a plant-based recipe that is super delicious. We have altered the recipe as we love the combination of sea salt and dark chocolate, and a more chocolatey frosting.

Last Easter, our DIY craft was based on eggs, faux chocolate Easter eggs, hee hee. This Easter, let’s have some real chocolate! During this time of the year we definitely would have chocolate (quite a lot!) lying around.

Nothing beats a warm chocolate cookie! Yum!

Easy dark chocolate chip raspberry vegan cookies deliciously ella

Raspberry Dark Chocolate Chip Plant-Based Cookie Recipe

(Adapted from Deliciously Ella)

Ingredients:

Cookie Recipe

200g Almond Flour

100ml maple syrup

4 tablespoons of brown rice flour

1 teaspoon of baking soda

1 tablespoon of coconut oil, melted

1 pinch of sea salt

100g dark chocolate broken into shards ( 70% dark chocolate)*

Raspberry Dark Chocolate Frosting Recipe

125g fresh raspberries

100g dark chocolate ( 70% dark chocolate )*

1 tablespoon maple syrup

Method:

  1. Pre-heat oven to 160 degree fan

  2. Put all the ingredients into a blender (except dark chocolate chips) and pulse until all the ingredients are combined. Add in the broken chocolate shards and pulse until everything is mixed well. If you’d prefer finer more even chocolate chips, chop them up before hand, however, we like uneven bits of large chocolate chips. We just broke up the chocolate into different shapes.

  3. Empty contents from blender and using a tablespoon to scoop out a spoonful of mixture and roll them into balls. Flatten them on the baking tray with your thumbs.

  4. Bake for about 15 - 20 minutes until golden and brown.

  5. Meanwhile whilst the cookies are cooling, add the raspberry frosting ingredients into a pan. Using medium low heat melt everything, crushing the raspberries. Once the chocolate has melted, using a hand blender, whizz up the sauce. Drizzle the sauce over the chocolate.

  6. Indulge the warm cookie! We love it with a cup of coffee! Or top it with a scoop of nice cream β€œplant-based ice-cream” or any ice-cream you have for a lovely treat.

*It’s a really good way to use up any chocolate you have lying around after Easter! Easy recipe to make with children.

Happy baking! Most importantly, happy devouring!

Love Word Search Paper Card Game

fun, diy, paperI AM AComment

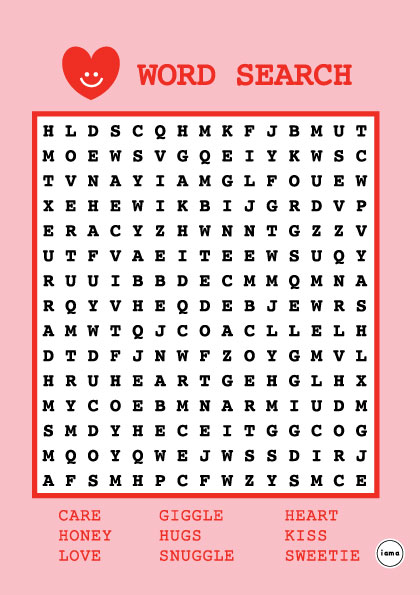
This Galentine’s and Valentine’s lands on a school night, we will be staying at home. To add extra fun to our hand written Valentine’s Card, we have created a Word Search where you will be able to download via our DIY β€œFree Printables” section. Simply, print it off on and tuck it into your Valentine’s or Galentine’s card or gift.

Print two copies so that and you can do the word search together!

Have plenty of fun finding the 9 words in this word search card! This word search is filled with all the lovey dovey words we love!

romantic word search DIY stay at home fun Galentine’s or Valentine’s

DIY Paper Fan Tutorial

diyI AM AComment
Make-Your-Own-Paper-Fan.jpg

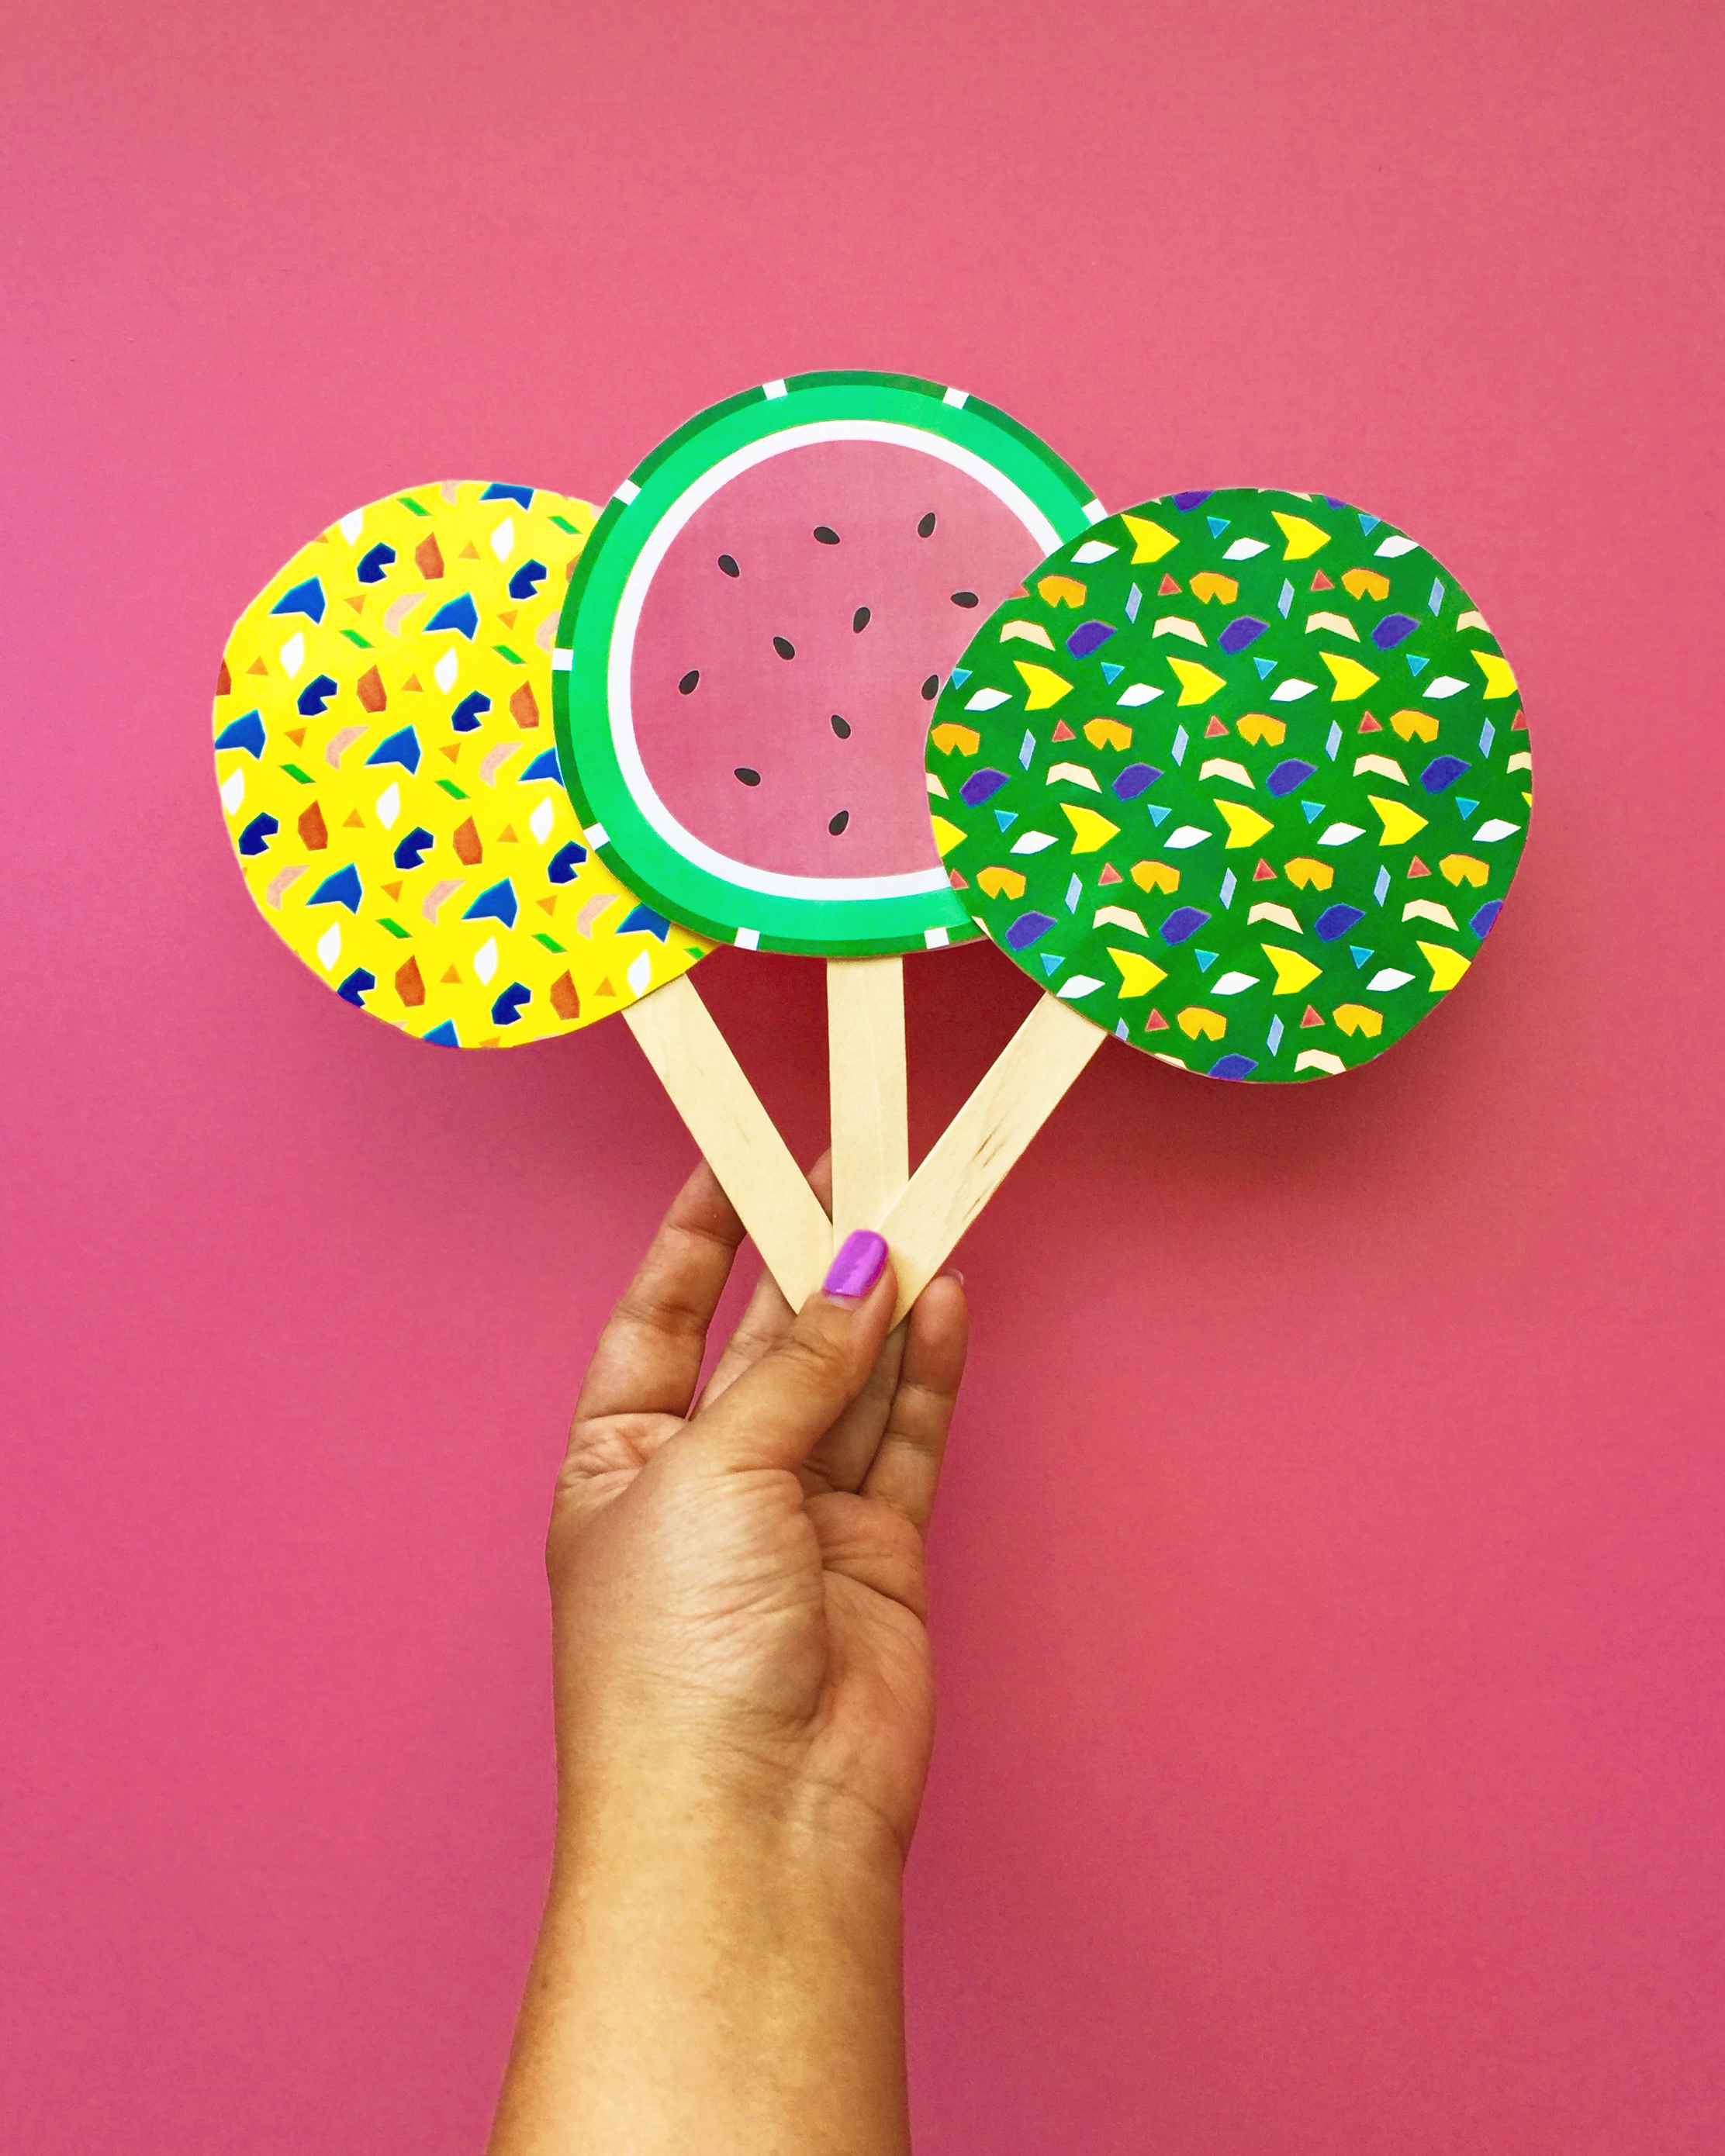
Feelin' hot hot hot!  We are all super hot stuff at this time of the year as Britain reaches the highest temperature of the year. Record breaking heat and the mercury is set to rise tomorrow again too. Heat wave ahoy! No matter how hot we are in this sweltering heat, there are moments we want to still be in our coolest. To cool down from this heat, let's make some paper fans to chill out or use them to fan your biggest fans.

This easy to do tutorial is also perfect to be done together with children during the summer holidays.

Here's how to make them:

MATERIALS (For each fan)

  • A4 Paper

  • Printer to print the fans templates on

  • Fan pattern templates are downloadable by clicking the following links : Sunny Chips, Watermelon, Forest Palm

  • A4 backing card to stick the fan template on (for a more powerful fan you will want to glue the fan template onto a piece of backing card). We have spare cards lying around in the studio which we recycled from other paper projects. To purchase we suggest these A4 Canford white cards from Paperchase. Alternatively, our preferred option is to recycle wherever possible, any empty cereal / any clean cardboard packaging will be great.

  • Wooden popsicle / lolly sticks. This could be easily purchased from craft shops / also cooking shops. We got ours from here, with the extras will be perfect to make ice lollipops too!

TOOLS

  • scissors

  • glue

METHOD

Paper-Fans-DIY.jpg
  1. Download and print the template. We have 3 template to choose from Watermelon (inspired by our watermelon card), Forest Palm or Sunny Chips

  2. Paste the A4 template onto your backing card.

  3. Once the glue is dried, cut around the patterned shapes. 2 patterned shapes would be resulted.

  4. Apply glue all around the non patterned side of the paper.

  5. Mark around 3cm from the top of the popsicle stick and apply glue to both sides of the stick.

  6. Place popsicle stick near the centre edge of one side of the patterned paper. (glue side facing up) Sandwich both sheets of paper together with the popsicle stick and press around the seams to make sure everything is glued together.

  7. Leave the fan to dry.

Once everything is dried, start fanning! This summer, this could be your one cool fan to make!

Paper-Fan.jpg

DIY Faux Chocolate Easter Eggs Tutorial

diyI AM AComment

Eggstra Eggstra! This year Easter lands on April's Fools day. We always like a bit of tongue and cheek, there's no better time for a tutorial for a little bit of egg-foolery! Hee hee!

Who likes chocolate easter eggs? We do! We have just the tutorial for the chocoholics out there that are expecting a chocolate easter egg this easter - NOT! It's April's Fool after all. 

Through this tutorial we will create the egg-foolery of faux chocolate eggs, by dyeing eggs to look like chocolate eggs. Yes, there's more to this than meets the eye and we shall sit the eggs on to a placement card. Perfect as an addition to an Easter table setup.

DIY Tutorial Recipe Faux Easter marbled chocolate eggs and mini eggs

Here's how to make them:

MATERIALS

  • 6 Duck Eggs (We use Clarence Court ones, as duck eggs have a white shell so it easier to colour the eggs)

  • 12 Quail Eggs (For faux mini chocolate eggs, just like mini eggs, quail eggs are ideal)

  • Breakfast Tea Bags (We love a strong brew. We like Yorkshire Tea Bags).

  • Coffee

  • Distilled White Vinegar

  • Paper to print the placement cards. We recommend pastel paper from Paperchase, but white paper will just look as nice.

TOOLS

  • scissors

  • spoon

  • oven rack to dry the eggs

  • saucepan or bowls to dye eggs in

METHOD

  1. Hard boil the eggs. For the duck eggs it takes about 15-20 minutes. For quail eggs about 10 minutes. Once boiled, run the eggs through cold water to cool the eggs down.

  2. We are using two of our daily brews, coffee and tea as natural dyes to dye the eggs.

    • Dark Brown Effect (like Dark Chocolate) : Make 2 strong cups of coffee and add 2 tablespoons of vinegar and pour into a saucepan.

    • Reddish Brown Effect (like Milk Chocolate) : Pour 2 cups of hot water into a bowl and add 4 tea bags. Add 2 tablespoons of vinegar into the bowl. Leave the tea bags in to brew for a stronger colour.

  3. Add 3 eggs to the coffee mixture and slowly simmer the eggs for about 30 minutes. The liquid should not cover the eggs entirely (for a marbled effect). If you prefer an even coat of colour around the eggs make sure the eggs are fully immersed in the dye. Whilst the eggs are simmering, use a spoon to turn them every now and then.

  4. Similarly add 3 eggs to the tea mixture. We have done a 50:50 split between the coffee / tea dyed eggs, it's optional. The liquid should not cover the eggs entirely (for a marbled effect). If you prefer an even coat of colour around the eggs make sure there is enough liquid to immerse the eggs. Whilst the eggs are simmering, use a spoon to turn them every now and then.

  5. The richness of the colour depends on how long you soak the eggs in the dye. For the marbled effect, as the vinegar erodes the texture of the shells once the dye is cooled, gently rub the surface of the eggs in a circular motion. You will see some of the dye colours being rubbed off ( don't worry, it’s part of the effect ), and place the eggs back to the dye. In total we left the eggs for a deeper colour in for about 3 hours. For the lighter shade eggs, we took them out after an hour.

  6. Leave the eggs onto an oven rack to dry. The tea bags dye liquid should result in eggs that have a more reddish tone like milk chocolate, but that is also dependent on the type of tea you use. The coffee dye should result in a darker brown, like dark chocolate shade.

  7. Eggs dyeing is a bit of "Eggsperiment" - if the solution is too acidic, the egg shells are more prone to crack. For dyeing quail eggs, note that, if the quail eggs are submerged in the dye for about an hour, when you rub the egg shells, the natural pigmentation (i.e. the teeny tiny polka dot freckles) may be rubbed off. This is due to the acid softening the shells of the eggs.

Natural-Dye-Easter-Eggs.jpg

8. Download the templates, print and cut them around the dotted line. We printed the placemat cards on pastel paper, however white A4 paper will work. The resultant placemat card will be around the size of a A6 postcard. and each postcard has tiny chicken feet illustrated on them with the options of the text "You're A Cracker!" or "You Make Me Crack" , quite literally. The templates can be downloaded by clicking on the below link:

You-Are-A-Cracker-Placement-Cards.jpg

9. Place the dried dyed eggs on to the placement cards and share the surprise!

You-Make-Me-Crack-Faux-Chocolate-Easter-Egg-Cards.jpg

The tradition of decorating easter eggs, is to signify the arrival of Spring. Although the weather is not quite spring yet, but we hope the pastels and fun with this little spoof will bring a spring in your step. Happy Easter! 

P.S. The placement cards can also be downloaded to be used for real chocolate easter eggs (without any foolery) for plenty of smiles.

Paper Snowflakes With Nobel Physicists

diy, paperI AM AComment

The Beast from the East has created plenty of snow around the UK. Paper snowflakes are in mind, especially these sciency snowflakes featuring three Nobel physicists, courtesy of Symmetry Magazine, an online magazine about particle physics. 

Templates to cut these awesome sciency snowflakes are available here.

DIY Ghost Pinatas Tutorial

diyI AM AComment

Hallow hallow! It's nearly Halloween. The time of the year where we like to have a lot of fun when ghosts, frankensteins, vampires are running rife. Booooooooo! Keep it spooky!

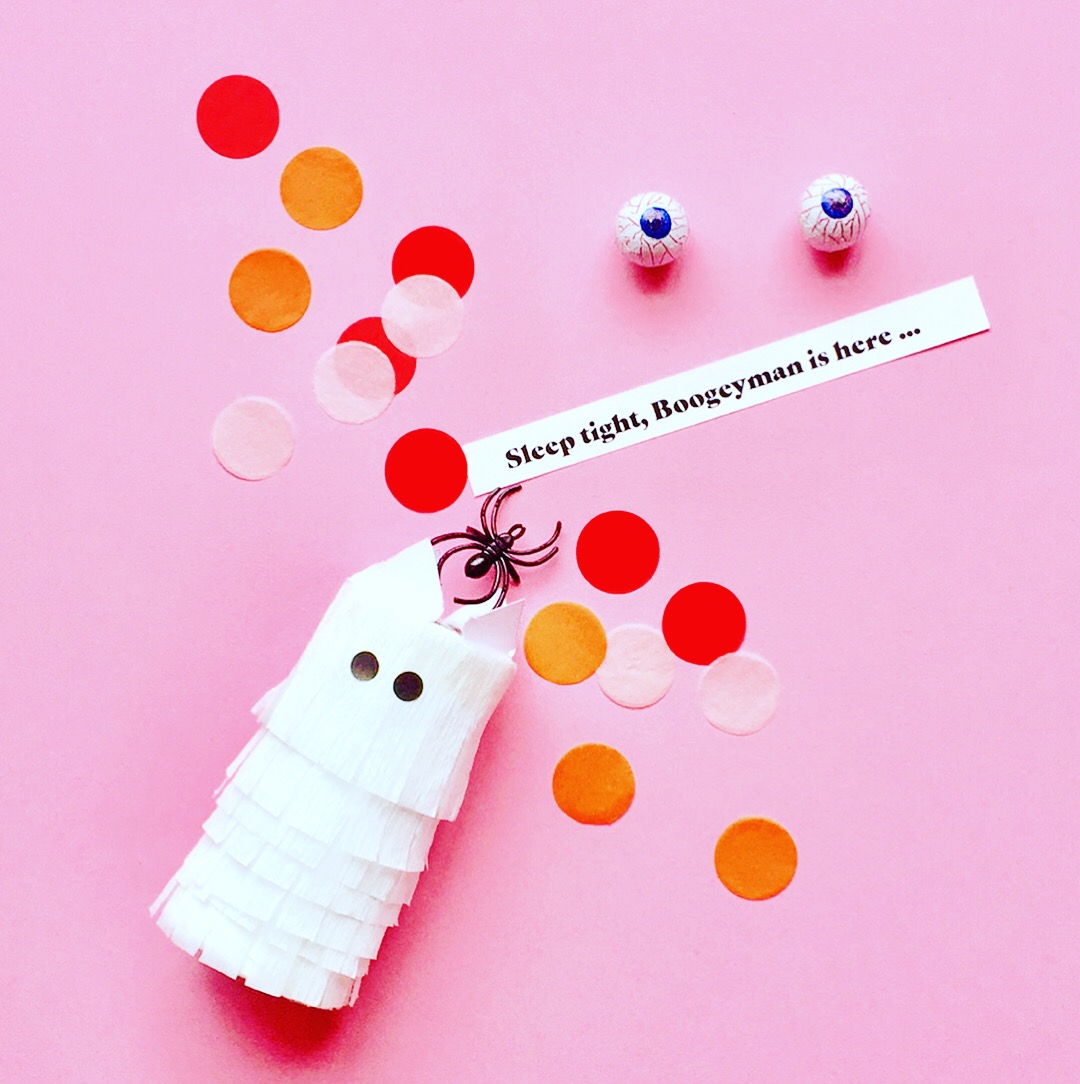
PiΓ±atas are the way to go for Halloween, as it can combine both the trick AND treat elements (instead of trick OR treat) all rolled up together in one. FUN! These piΓ±atas will make fab Halloween party favours, part of the decorations or place settings. 

There are bound to be some lonely toilet rolls lurking around, why not reuse them and make something cute prior to recycling.

Halloween-Ghost-Pinata-Tutorial.jpg

MATERIALS (to make 1 piΓ±ata)

  • Toilet roll

  • White crepe paper

  • A4 Paper

  • Treats - sweets or chocolates of choice. Snack size chocolates are perfect as well as halloween themed candies and chocolates including bloodshot eyeballs, pumpkins etc

  • Tricks - little scary toys such as plastic spiders, scary finger puppets, eyeballs, dracula fangs etc

  • Confetti - if ready made confetti is not available it's straight forward to make your own by cutting strips of paper, or teasing bits of cotton wool will work too to fill the cavity of the toilet roll

  • Little scary message - these could be little scary comments which could be printed or handwritten. Extra touches could include writing these notes with a red marker, or dip your fingers in red ink and write the little notes with your fingers to make it more scary.

  • Black round stickers for the eyes - if stickers are not available, this could be substituted with using a black marker instead to draw the eyes of the ghosts on the piΓ±ata

TOOLS

  • pencil

  • scissors

  • double sided tape

  • white masking tape / washi tape

Ghost-Pinata-DIY-Materials-Order.jpg

METHOD

  1. Place the end of the toilet roll on top of an A4 piece of paper. Use a pencil to trace around the toilet roll. Draw a larger circle around the first circle, around 1cm larger. Cut around the larger circle. Make fray slits around the circle by cutting from the larger circle into the border of smaller circle. These fray slits will help to bend the larger circle over one end of the toilet roll and act as a lid. Repeat this step as there needs to be 2 lids to secure the ends of the toilet roll, one lid for each end of the toilet roll.

  2. Use white masking tape or white washi tape to tape one of the lids on to one end of the toilet roll. Make sure the lid securely covers the complete end of the toilet roll.

  3. Fill the toilet roll with goodies. Confetti, little spooky toys, candy and chocolate treats and include a spooky message.

  4. Take the second lid that has been made in step 1, and tape the lid to the open end of the toilet roll. Now both ends of the toilet roll should be closed.

  5. Take the crepe paper, wrap it around the toilet roll widthwise, to estimate the length of crepe paper required to cover the circumference of the toilet roll. Cut around 8 strips of crepe paper and fringe the edges. Start from one end of the base, stick white fringe crepe paper onto the toilet roll using double-sided tape. Repeat until the whole toilet roll is covered with white fringe crepe paper.

  6. Peel off 2 circle black stickers, add onto the roll to make eyes for the ghost. Alternatively, a black marker could be used instead to draw the features of the ghost piΓ±ata. Whahey, a ghost piΓ±ata, repeat to make more! Distribute the spook.

Ghost Pinata.JPG

Happy Halloween! Show off your BOO-tys and have a spooktacular one!

P.S. Other treat option, Frankenstein Frank Halloween Treat Bags

DIY Sandwich Wrap

diy, yumI AM A1 Comment
image.jpg

With the Queen's 90th birthday this weekend and the picnic season in the loom. Sandwiches are much called for. It will be one of the street party foods served during the street party at the Mall at the Patron's Lunch. Many neighborhoods across the UK will also be celebrating with their own street party or having a picnic. We had a peek at Marks and Spencer's website on what will be served at the Patron's lunch to 10,000 people celebrating along with the Queen - all we can say it is definitely nothing short of YUM and will be an absolute fun outdoor affair. Rain clouds... please make way for the sun. β˜€οΈ

We love picnics. One of the best past times we enjoy. With the sandwich featured in most picnics, afternoon teas and parties, let's dress them up and make them fun.

This tutorial is perfect for any sandwich shapes and sizes. Whether the sandwiches are finger sandwiches, baguettes, wraps, rolls, baps, triangular sandwiches etc., these wrappers will be applicable. Yay! ( We hope Nigella, Delia and Mary Berry - the domestic goddesses which totally inspire us will approve of this. )

Ingredients : 

  • Sandwiches of your choice 
  • Scissors
  • Sandwich wrap template downloadable from this link
  • A4 paper
  • Printer
  • Washi tape or Cellotape  
image.jpg

Method :

 1. Download the template and print it. Each sheet contains 3 strips in 3 different colors. If you are making a mixture of sandwiches, we have made 3 in this tutorial including Cucumber Sandwich, Coronation Chicken Sandwich and Egg and Cress Sandwich, it's a good way to differentiate the sandwiches by color coding them via three different color strips. 

2. Depends on the size of your sandwiches, roughly each paper stripe is good for 2 small sandwiches for example finger sandwiches or baguette, or 1 large sandwich. 

3. Trim strips from template with scissors. If you have crimping scissors, it will be fun to give the strips a border. Scallop edge scissors are used in the example.

4. Take a ready filled sandwich and using one strip to wrap around, measure to size roughly how much paper strip you'd need. Measure and cut to size enough strips to cover the sandwiches you had prepared. 

image.jpg

5. Wrap paper strips around the sandwiches. Securely with cellotape, sticker, washi tape or even twine or a piece of string.

So here it is - all done! Bring out the bunting, or picnic mats, or some nice China, feast and have fun with your friends and family whether it's an outdoor picnic, afternoon tea, or home parties.

image.jpg

P.S. Using a mixture of different breads for example multigrain for one type of sandwich or rye on another. Same goes for filling the sandwiches in different bread shapes will be fun too.

We are curious to know what's your favorite sandwich fillings. Feel free to tag your sandwiches #iamacrafts to be featured. Bon appΓ©tit ! πŸ˜‹

DIY Picnic Menu Cutlery Holder

diyI AM AComment
image.jpg

It's the picnic season! Yay! With unpredictable weather fronts (Yup! We Brits love some weather chin wag β˜€οΈβ›ˆβ˜”οΈ), we should have a picnic regardless. Apart from waiting for the weather to turn sunnier, the alternative is to bring the outdoors in and have an indoor picnic - why not?

Whether it is indoor or outdoor we want to maximise the fun. With plenty of very cute and lovely picnic plates and accessories around, for example Tiger Stores have some rather sweet stripey paper plates and dinky paper plates which are amazing for cakes 🍰 - perfect to fit a slice of Battenberg cake and Bakewell Tarts as we did in our picnic photo shoot. Also at Tiger Stores look out for some pretty cool fries holder which we have used for holding carrot sticks. Marks and Spencer has a lovely confetti pattern paper plate set and of course Meri Meri they have some very sweet flowery Liberty print party paper plates.

To compliment the cute cutlery, paper plates we have a tutorial where we will make some cutlery holders or chopsticks holders with a hidden menu. This is also perfect for dinner parties at home when you want to tell your guests a little bit about the food or even include a pre dinner game. So let's begin the fun!

image.jpg

 Ingredients :

  • Book of wrapping paper for Small Presents or any wrapping paper or A4 paper you have
  • Scissors / Cutter
  • Cutlery / Chopsticks
  • Ruler
  • Cutting Mat (if you are using a cutter) 
  • Printer if you are printing the menu / Pencil or Pen if you are handwriting it
image.jpg

Method :

image.jpg

1. Write or print the menu on to the selected sheet of wrapping paper. If you are using our wrapping paper book one sheet of wrapping paper will yield 2 sets of cutlery holders. Take note, we did mark a guide in the middle of the paper to make it easier to split the paper in half. It's also just as easy to fold the piece of paper in half to mark the middle line.

image.jpg

2. Split the paper with the menu written on it into 2 halves. We have found using a cutter easier in this case as have created a split line. Scissors will just be as straight forward.

image.jpg

3. Take one of the split sheets, with the pattern side facing down and menu side facing up, fold it in half.

image.jpg

4. Fold once more in half. 

image.jpg

5. Fold the opposite side in half. 

image.jpg

6.  Open up the sheet. Turn the sheet lengthways and fold a triangle, starting from the bottom right hand corner to the second fold line.

image.jpg

7.Β  Fold down a small triangle, starting from the top right side of the sheet to the first line of the fold.

image.jpg

8. Start from the small triangle side, fold over once.

image.jpg

9. Repeat the fold, by folding over one more time. 

image.jpg

10. Using the bottom right triangle, fold up to form a rectangle.

image.jpg

11. Rotate the rectangle left, i.e. Have the rectangle facing upright. Then fold up roughly 0.5cm from the bottom. This will help create a seal for the cutlery holder.

image.jpg

12. Flip over the rectangle and here you go! A cutlery holder with a surprise hidden menu is made. Start slotting in your cutlery! Repeat the above steps to make more cutlery holders. 

image.jpg

In Central London, here are a few places we love to have a picnic :

  • Hyde Park
  • Coram's Fields
  • Lincoln's Inn Fields
  • Primrose Hill
  • Regent's Park
  • Victoria Park
  • Green Park
  • St. James's Park

Have  a yummilicious and fun picnic - Happy feasting! πŸ˜‹πŸ½

image.jpg